IP warming is a fresh start. It’s an opportunity to improve performance, reduce costs, and reach inboxes. There are several reasons why email marketers do it, but only one way to do it right.
Diversifying your IP range can be very helpful when you’re sending in high volumes. There are many reasons to do It, including (but not limited to):
- Protecting separate IPs from the impact lower-engaged users have on deliverability.
- Migrating to another SMTP relay due to a better deal/email platfontional behaviors/actions that wice you duplicated your camrm capabilities.
- Landing high volume email campaigns in a timely manner.
However, you can’t just dive right into high-volume sending from the get-go — your IP needs ‘warming up’ first. If you don’t warm up your IP, it’s likely to be rejected by ISPs.
But before we dive into the whole IP warming thingy, let’s explain what’s an IP, and how it interacts with ISPs in the first place.
What you need to know about your IP address
IP stands for ‘Internet Protocol.’ If a device is capable of communicating via the internet, it has an IP address.
IP addresses allow us to reach websites, send emails, laugh at dogs playing the piano – all that good stuff. Behind every domain lies an IP address.
When you type ‘ongage.com’ into your address bar, you instruct the interface to find Ongage’s domain. It does this by identifying the IP address of Ongage’s domain. As the computer scientist JB Postel put it, “A name indicates what we seek. An address indicates where it is. A route indicates how to get there.
Emails send and receive packets of data across the network, which means that they must have an IP address. If an ISP knows your IP, your packets will pass. If not, It will kick them out.
Think of your new IPs as eager newbie athletes who have to prove themselves before making it to the team.
Before getting into the serious business of winning medals for the team, they need to pass a selection panel and tryouts. After that, they need to prove themselves during practice sessions and competitions in order to progress to the national level.
ISPs are like the sports team coaches and managers your new IP needs to impress if their athletics career is going to liftoff.
Memorable, right?
Now, let’s answer one of the first questions email marketers ask themselves about IPs:
Should you use a dedicated IP. Or a shared IP?
A shared IP is part of a pool of IPs.
If you send using a shared IP, you will be doing so along with several other email marketers – for better or for worse.
A good group of email marketers will lift you and improve your sender reputation, helping your emails to land in the inbox. However, a lousy group will have the opposite effect. You may find your sender reputation plummeting through no fault of your own.
With a shared IP, you are not in total control of your sender reputation, which means you have fewer options available to you when trying to improve deliverability.
A dedicated IP gives you complete control of your sender reputation. You are entirely responsible for your deliverability, and your sender reputation is directly affected by your performance.
The advantages of using a dedicated IP are felt when you start sending emails in high volumes (i.e., above 100k per month).
ISPs are wary of high-volume sends, and a dedicated IP address gives you greater control over your sender reputation. Using a dedicated IP as a high email volume sender allows you to build up a better reputation with the ISPs compared to shared IPs.
But before you are opting-in for a dedicated IP, it’s important to you step up your IP warming game.
Let’s start by tackling the first question on email marketers’ minds before they dive into IP warming:
Do you need multiple IPs?
At this point, you may be wondering if you need more than one IP. If you’re a high volume sender, you probably do. If you’re not planning to send in high volumes, you probably don’t.
Spreading your communications over several IPs can help deliverability – but this is true for professionals, and when you’re learning how to warm your first IP, take your time.
Multiple IPs are most useful in the following cases:
When you’re sending in high volumes
Once you get over the 100K per month mark, multiple IP addresses can be handy. This is especially true if your emails are time-sensitive – i.e., if they need to arrive within a specific timeframe.
For example, let’s say that you need to send out a campaign of 500,000 emails to reach all recipients by 2 pm. The sending time for this volume of emails from a single IP address will be pretty long. The likelihood of all emails arriving within the correct timeframe is low.
If, however, you split the sending over several IP addresses, you halve the send time with each new IP.
Further, ISPs can limit the number of emails arriving from one IP, putting you in a bind when sending in high volumes. Indeed, diversifying your IP pool can help you get into the inbox no matter how many emails you send.
Of course, the above can vary and is affected by many factors such as the IP itself, the ISP, your infrastructure, sender reputation, and more.
While one brand may be able to send millions of emails from a single IP, another might need more.
When you have multiple mail streams
Professional email marketers know that you should use different IPs for transactional emails and promotional ones. In addition, they usually consider using different IPs and subdomains for different countries, brands, and web properties.
This ensures that each IP maintains its sender reputation – transactional emails, which are highly important and must get into the inbox, won’t have their reputation damaged by less engaging promotional emails, and so on.
You probably don’t need a new IP or multiple IPs in the following cases:
If your sender reputation is dropping
If your reputation is dropping and it’s nothing to do with scaling or multiple mail streams, don’t be tempted to hop to a new IP and start over. Remember, your IP is tied to your domain. If ISPs see that you are ‘snowshoeing’ your domain (spreading messaging over multiple IPs), they won’t be impressed.
Instead, work to recover your current IP’s reputation by finding where the problem lies, fixing it, and then continuing to follow deliverability best practices.
How to open a new IP?
Opening a new IP address is a simple process. Essentially, you ask your SMTP relay provider for a new one. However, if you’re starting from scratch, it might be best to read through on how to open a domain and authenticate it before you go any further.
Do you need IP warming?
A new IP is an unknown quantity of packets, and ISPs are suspicious of what they don’t know.
There’s a good reason for this. Hopping from IP to IP (or domain to domain) is a common practice for spammers. Because of this, ISPs take measures to defer or block messages from IPs and domains without a sender history.
If you bombard the likes of Gmail and Yahoo with emails from a new IP, they’re likely to err on the side of caution and refuse your emails.
Having emails refused by ISPs harms your sender reputation, which will lower your future campaigns’ deliverability.
To prove your `worthiness’ to the ISPs, you need to take things slowly. Take the time to prove to them that you’re a valid sender that people genuinely do want to hear from.
It’s a time-consuming process, but it’s worth it to ensure great deliverability in the future.
When should you warm up a new IP?
Warming up a new IP is necessary when:
- You’re moving to a new SMTP relay.
- When you’re opting to use another IP within the same SMTP relay – that is something you might do when you need to:
- Send emails in high volumes.
- Send emails from different subdomains, and/or
- Protect certain IPs from the effects of lower-engaged users.
It’s also worth noting that warming up a new IP doesn’t just impact that IP. It has an impact on your entire domain. The better you warm your IPs, the more that ISPs will trust your domain in general.
And it works the other way around. If you already have a stellar domain reputation with ISPs, the IP warming phase will most likely be very short as you already have the ISPs’ trust.
You don’t need to warm up a new IP when you’re sending messages through a shared IP. However, we highly recommend that you opt for a dedicated IP when sending high volumes of emails.

How do you warm up a new IP?
Time to get down to business. From authentication to escalation, we poured here some knowledge bombs for each step of the way. Here’s the roadmap to IP warmup!
Authenticate your domains
You’ll never make that athletics team if you can’t prove certain crucial things – like who you are, where you’re from, your age, and so on.
To be seen as trustworthy enough to get into the inbox, IPs and domains must also prove their credentials.
Authentication protocols tell ISPs who the sender is. Without authentication protocols, your emails will look very dodgy. No self-respecting ISP will let your unauthenticated emails into inboxes.
Setting them up properly shows that you’re a reputable sender with honest intentions. This not only raises your sender reputation; it also improves trust in your domain and your brand communications as a whole.
If you haven’t done so yet, do it now. There’s no use in IP warming if your authentication protocols are not set up correctly.
When implementing authentication protocols, consider the following first:
- SPF (Sender Policy Framework), and
- DKIM (Domain Keys Identified Mail).
These should be the bare minimum that you put in place.
SPF will check that you are who you say you are.
DKIM tamper-proofs your messages by encoding their headers so that only the intended recipient can open and read your emails.
Once these are set up, move on to DMARC (Domain Message Reporting and Conformance).
DMARC improves deliverability with a feedback system. This system closes loopholes in the authentication process and gives senders options for when DMARC fails.
For example, senders can ask ISPs to reject, quarantine, or do nothing with an email when it fails DMARC. The ISP has an ultimate say in what happens to the email, but DMARC does give senders more transparency.
DMARC data can be a great help when working out what’s going on when deliverability drops, or when someone’s attempting to spoof your domain.
While BIMI can also be considered a part of this group, it isn’t an essential protocol for deliverability purposes, so don’t worry if you haven’t implemented it.
Create smart segments
When proving your worth to a selection panel, you lead with your strongest moves. When proving your worth as a new sender, you should lead with your strongest, most-engaged recipients.
Recipients who give high engagement metrics will improve and build your sender reputation fast.
You can determine your most engaged recipients by studying historical campaigns’ interactions, but you may not need to. Engagement data will build up quickly as you release your new campaigns.
If you don’t have this data, try looking at other metrics. Last login date, for example, or last join date. In some cases, historical campaign data may be more useful than new data, especially when it comes to opt-in dates.
If someone recently subscribed to your list, for instance, he’s more likely to interact with your emails. This data can be used to segment subscribers and be a part of the time-stamping new subscribers have when entering the database.
To impress the ISPs in these early days, segment and leverage your most engaged audiences. Automation rules can help you to do this easily, in two ways:
- By sending the people with the highest open and click rates a delayed transactional message. If someone regularly clicks your transactional messages, send them two rather than one (with a delay of a day or so in between).
- By capitalizing on intent. You can mark a recipient’s intent based on the message or link that they clicked. You can then send a follow-up message based on it. For example, if you send in your emails link with Amazon, Google, or Microsoft content, and the recipient clicked on an Amazon link, send another message focusing exclusively on Amazon related content.
Remember, though – pace yourself.
Racing into the arena and burning all your energy in the first five minutes will lead to exhaustion and won’t impress the selection panel. Similarly, rushing straight into high volume sends (even to engaged recipients) will make ISPs wary.
Choose a warmup method
There are two main ways to go about warming up your IP:
- A ramp-up period in which you send only once to each contact in your list.
- A ramp-up period in which you send a different email message each day to all the contacts you messaged the previous day plus some.
The amount you increase your sending volume will depend on your schedule, but it’s usually around X2 or so. When you continue this method, add new contacts every day until you’re messaging the entire list.
Both methods ultimately take you to the same place, but the journey is different. The method that works best for you will depend a lot on your brand’s own communication and engagement styles.
Below, you’ll see the typical approach suggested by most ESPs:
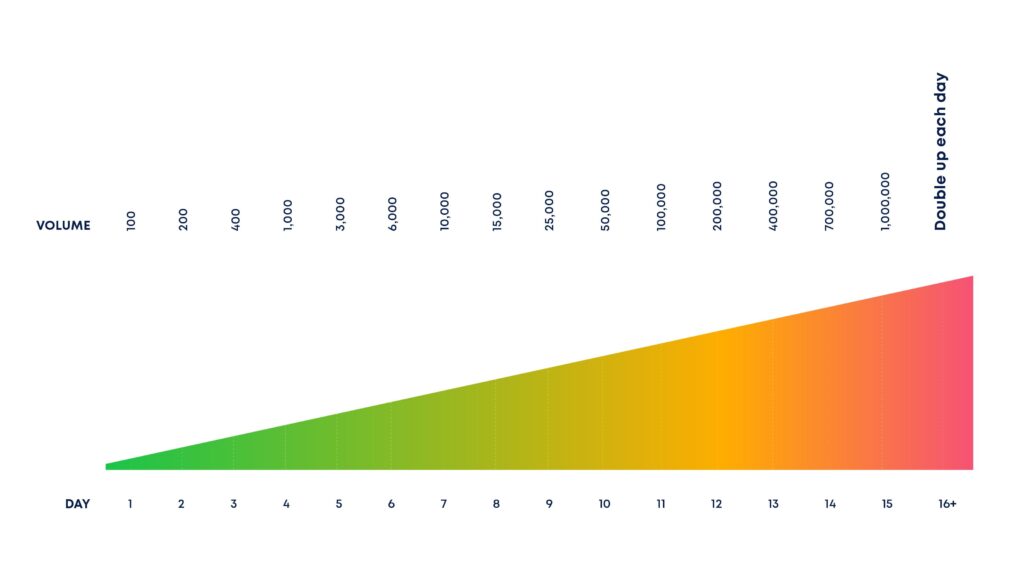
However, we suggest a more flexible approach, comprised of different strategies for your choosing:
| Day | Aggro | Easy | Light | Micro |
|---|---|---|---|---|
| 1 | 1,500 | 1,500 | 1,500 | 50 |
| 2 | 3,000 | 2,000 | 2,000 | 100 |
| 3 | 5,000 | 3,000 | 3,000 | 200 |
| 4 | 8,000 | 4,000 | 4,000 | 250 |
| 5 | 12,000 | 6,000 | 5,000 | 310 |
| 6 | 18,000 | 8,000 | 7,000 | 390 |
| 7 | 27,000 | 11,000 | 9,000 | 490 |
| 8 | 40,000 | 15,000 | 12,000 | 610 |
| 9 | 58,000 | 21,000 | 16,000 | 760 |
| 10 | 85,000 | 29,000 | 22,000 | 950 |
| 11 | 124,000 | 41,000 | 30,000 | 1,190 |
| 12 | 180,000 | 57,000 | 41,000 | 1,490 |
| 13 | 261,000 | 80,000 | 55,000 | 1,860 |
| 14 | 379,000 | 112,000 | 74,000 | 2,330 |
| 15 | 550,000 | 157,000 | 100,000 | 2,910 |
| 16 | 798,000 | 220,000 | 135,000 | 3,640 |
| 17 | 1,158,000 | 308,000 | 182,000 | 4,550 |
| 18 | 1,680,000 | 431,000 | 246,000 | 5,690 |
| 19 | 2,436,000 | 603,000 | 332,000 | 7,110 |
| 20 | 3,533,000 | 844,000 | 448,000 | 8,890 |
| 21 | 5,123,000 | 1,182,000 | 605,000 | 11,110 |
| 22 | 1,655,000 | 817,000 | 13,890 | |
| 23 | 2,317,000 | 1,103,000 | 17,360 | |
| 24 | 3,244,000 | 1,489,000 | 21,700 | |
| 25 | 4,542,000 | 2,010,000 | 27,130 | |
| 26 | 6,359,000 | 2,714,000 | 33,910 | |
| 27 | 3,664,000 | 42,390 | ||
| 28 | 4,946,000 | 52,990 | ||
| 29 | 66,240 | |||
| 30 | 82,800 | |||
| 31 | 103,500 |
It’s also worth noting that ISPs behave differently. You may find that you can (for example) warm up more quickly with Yahoo than with Google.
Here’s an IP warming strategy adjusted to take the differences between ISPs into account:
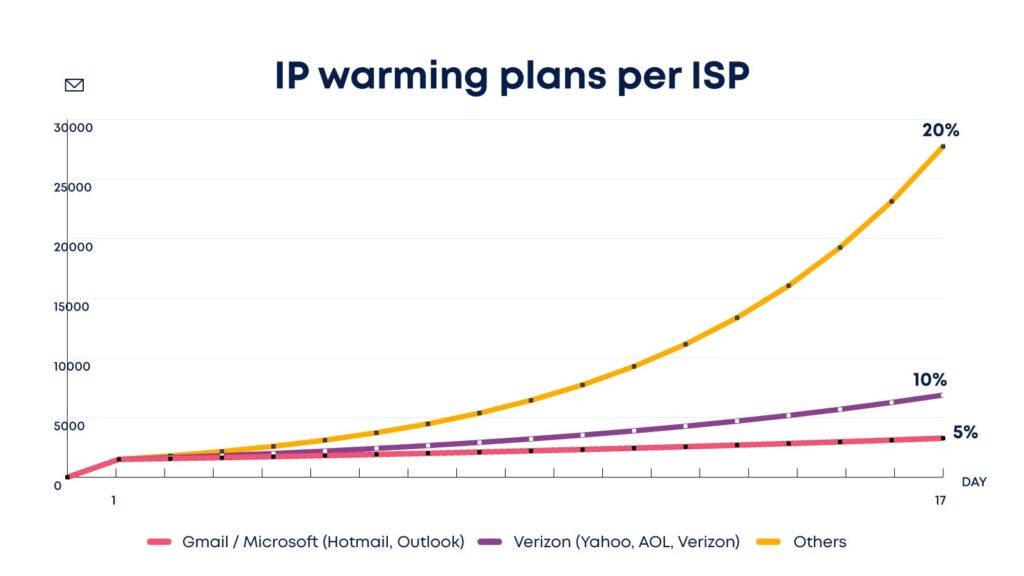
Taking Gmail and Microsoft as an example, we suggest starting with 5% daily increases. Slowly, but surely, if your metrics signal you’re doing well, ramp up to a 10% daily increase, followed by 20% and 40%.
| Gmail | Verizon (Yahoo, AOL, Verizon) | Microsoft (Hotmail, Outlook) | Others | |
|---|---|---|---|---|
| Start with a 5% increase | Start with a 10% increase | Start with a 5% increase | Start with a 20% increase | |
| Day 1 | 1,500 | 1,500 | 1,500 | 1,500 |
| Day 2 | 1,575 | 1,650 | 1,575 | 1,800 |
| Day 3 | 1,654 | 1,815 | 1,654 | 2,160 |
| Day 4 | 1,736 | 1,997 | 1,736 | 2,592 |
| Day 5 | 1,823 | 2,196 | 1,823 | 3,110 |
| Day 6 | 1,914 | 2,416 | 1,914 | 3,732 |
| Day 7 | 2,010 | 2,657 | 2,010 | 4,479 |
| Increase to 10% | Increase to 20% | Increase to 10% | Stay with 20% | |
| Day 8 | 2,211 | 3,189 | 2,211 | 5,375 |
| Day 9 | 2,432 | 3,827 | 2,432 | 6,450 |
| Day 10 | 2,676 | 4,592 | 2,676 | 7,740 |
| Day 11 | 2,943 | 5,510 | 2,943 | 9,288 |
| Day 12 | 3,237 | 6,612 | 3,237 | 11,145 |
| Day 13 | 3,561 | 7,935 | 3,561 | 13,374 |
| Day 14 | 3,917 | 9,522 | 3,917 | 16,049 |
| Increase to 20% | Increase to 40% | Increase to 20% | Increase to 40% | |
| Day 15 | 4,701 | 13,330 | 4,701 | 22,469 |
| Day 16 | 5,641 | 18,663 | 5,641 | 31,456 |
| Day 17 | 6,769 | 26,128 | 6,769 | 44,038 |
| Day 18 | 8,123 | 36,579 | 8,123 | 61,654 |
| Day 19 | 9,747 | 51,210 | 9,747 | 86,315 |
| Day 20 | 11,697 | 71,694 | 11,697 | 120,841 |
| Day 21 | 14,036 | 100,372 | 14,036 | 169,178 |
| Increase to 40% | Stay with 40% | Increase to 40% | Stay with 40% | |
| Day 22 | 21,054 | 140,521 | 21,054 | 236,849 |
| Day 23 | 31,581 | 196,729 | 31,581 | 331,589 |
| Day 24 | 47,372 | 275,421 | 47,372 | 464,224 |
| Day 25 | 71,057 | 385,589 | 71,057 | 649,914 |
| Day 26 | 106,586 | 539,824 | 106,586 | 909,880 |
| Day 27 | 159,879 | 755,754 | 159,879 | 1,273,831 |
| Day 28 | 239,819 | 1,058,056 | 239,819 | 1,783,364 |
Executing your strategy
Manually warming up your IP
For ramp-up method 1, we recommend that you use the following steps:
- Prepare your segments. Ongage comes with an ‘All list members’ segment preset. We advise that you use this or the equivalent provided by your email marketing platform.
- Isolate your segments. Within the ‘All List Members’ metric, isolate a segment using the behavioral criteria ‘Sent in the last 30 days’.
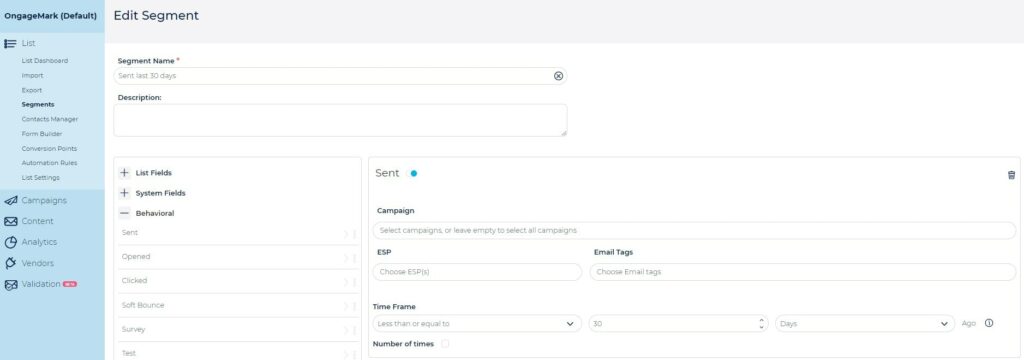
- Prepare and send a campaign. When configuring your campaign, use ‘include/exclude’ toggles to include ‘All list members’ and exclude ‘Sent in the last 30 days’.

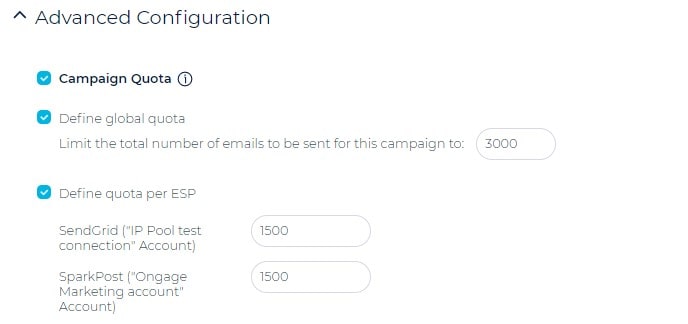
- Set sending quotas. Head into ‘Advanced configuration’ and limit the number of emails to send (according to your quota for that day).
- Duplicate and repeat! Ongage makes it easy to duplicate campaigns with this tool:

- Once you duplicated your campaign, head back into advanced configurations, and raise the quota. Keep repeating this until you reach the end of your warm-up period.
For ramp-up method 2, use the following sthis will ensureps:
- Prepare your segments as in ramp-up method one above.
- When configuring your campaign, use include/exclude toggles to include both ‘All list members’ and ‘Sent in the last 30 days’. Then check the ‘Send according to order’ option.

- This will ensure that you send to everyone you messaged on the previous day, as well as adding new contacts from ‘All List Members’ that haven’t yet been emailed.
- Duplicate and repeat.
Automatically warming up your IP
When using Ongage, you can decide to leave the entire warmup process in our trusty hands. This will allow you to enjoy the deliverability improvements while saving time by doing a one-time setup for the whole process.
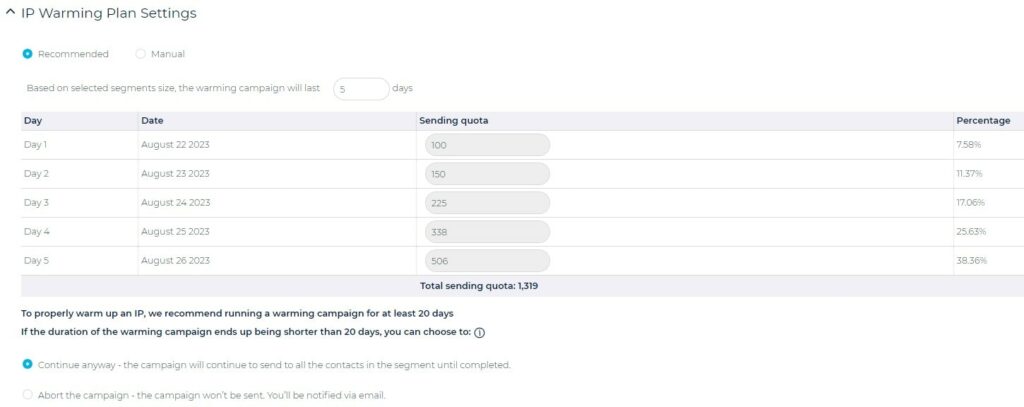
How does it work?
Once you create a new warmup campaign, you’ll see a preconfigured table indicating the sending quota for each day. This quota is automatically calculated based on the number of days you’d like to warm up your IP (we recommend between 20 to 30 days) and the SMTP relay you’re using.
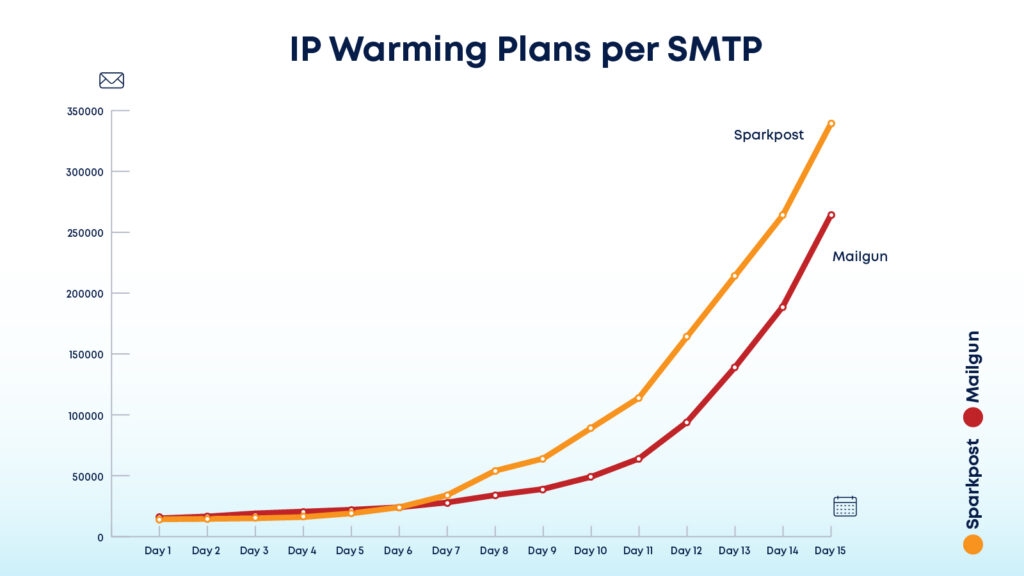
For example, if you’re sending via SparkPost, the quotas you’ll see are based on SparkPost’s warmup plan. But if the IP you’re warming is from Mailgun, then the numbers will change based on Mailgun’s plan.
That doesn’t mean you don’t have control. You can adjust the number of days the campaign will run and the quotas for each day.
The automatic IP warmup ensures high deliverability by enabling throttling by the hour, the best practice for IP warmup.
At the moment, you can send one email message to each contact once for the entire duration of the campaign. If you want to send more than one message during your warmup plan, you’ll need to use one of the manual methods explained above.
Be sure to stay tuned as we plan to add and improve this feature even further!
Track your performance like a hawk
You’ve got past the selection board. You’re through to the tryouts. Well done! You can bet, though, that the coaches are going to be scrutinizing your every move for the next few sessions.
You need to be hyper-aware of your form, fitness, and how you’re performing if you’re to convince them to advance you to the next level.
Early engagement metrics are like tryouts for your IP. They’re vital to establishing your sender reputation with ISPs.
Remember, you have to please each ISP to make it onto the team. As we mentioned above, ISPs respond differently to IP warmup strategies.
If you start getting warning signs (a falling open rate, for example) with Gmail but not with Yahoo, segment your campaigns by ISP and proceed normally with Yahoo while slowing things down for Gmail.
Just as you’d segment and personalize your campaigns for different audiences, you should also segment and personalize your campaigns during warmup for different ISPs.
After every send, monitor your email analytics carefully:
- Have bounce rates increased? Cool your campaign down.
- Got a spike in spam complaints? Cool your campaign and check that your unsubscribe button is in plain sight.
- Are click rates dropping? Falling click rates are a sign that you’re no longer engaging your audience. It can also signal and result in your sender reputation dropping.
Examine your campaign configuration and messages. Perhaps you’re sending the same (or similar) messages to the same audience. Check to see whether your engagement rates are having problems across the board, or if the issue is confined to one ISP. The latter can indicate you have a reputation issue with this specific ISP.
Google, Microsoft, and Verizon provide free tools to help you check your sender reputation and deliverability. Gmail Postmaster is a handy tool that will take the guesswork out of understanding your reputation.
At a glance, it will tell you whether the ISP considers you to be a Good, Medium, Low, or Bad sender. It will also give you data on authentication failures, spam complaints, and more. Microsoft SNDS for Outlook and Hotmail, and Verizon Postmaster Tool for Yahoo and AOL work in a very similar way.
You can read more about Gmail Postmaster and similar tools here.
Scale your efforts
Once your metrics have stabilized, and everything looks good, it’s time to scale.
Continue sending to the same hyper-engaged segment, but up the daily limits on your sending.
If your metrics remain healthy after this, you can slowly add your less-engaged users to the sending list. Just be sure not to add non-engaged users!
You may well find that you have to scale and decrease a couple of times to get your metrics in order. Don’t worry – that’s normal! It’s all part of the warmup process.
Repeat
After scaling, you’ll continuously move between steps 5 and 6, adjusting your:
- Inclusion/exclusion segments.
- Messages.
- Sending volume (cooling down and ramping up when possible).
If you do all this correctly, you should find yourself with a stellar IP reputation within a couple of weeks. The ISPs will love you, and your emails will always hit the inbox.
Additional behaviors and actions that will help your IP warming process
List scrubbing
Exclude all users who have previously complained, unsubscribed, hard-bounced, or are generally inactive.
Sending to these users invites deliverability risks such as low engagement rates, spam traps and invalid email addresses.
This is something you should continue doing throughout your IP’s email marketing career.
Read more about email validation here.
Sending consistently
Try to send consistently every day. However, if you miss a day, let it go and pick up where you left off. If you try to play catch-up, ISPs will likely notice the suspicious spike in volume.
Consistency is also an engagement metric that helps you to create audience habits, i.e., they know that they’re going to get an email from you first thing Monday morning.
As we explained, ISPs love engagement, and you should always strive to improve it.
Sticking to your schedule
Don’t be greedy. Stick to your ramp-up schedule, no matter how many IPs you have.
For example, having 2 IPs doesn’t mean that you can double the number of messages you send in one day. You are building the reputation of your domain, after all. What you do with one IP impacts your domain as a whole.
Being patient with the process
Yes, warming up your IP takes time. Believe us when we say that it’s worth it. Warming up properly will save you a lot of deliverability issues down the line.
Splitting non-time-sensitive sends over various days
If they don’t all have to go out at once, don’t send them all at once.
Let non-time-sensitive campaigns out bit by bit, as part of your warm-up schedule. Non-time-sensitive campaigns are great for ramping up new IP addresses without disrupting your marketing schedule.
Splitting campaigns between your new IP address and your legacy system
This will ensure that your audiences don’t experience any disruption in messaging while you’re warming up the new IP. Their emails will still arrive on time, as expected, and their experience will continue to be smooth and seamless while you transition.
Migrating smaller-volume triggered campaigns to the new IP first
Slow and steady wins the race when warming up IPs. Migrate the smaller campaigns over first rather than overloading the newbie with the big stuff.
In email marketing, IP warming is just the starting point
Warming up your IP takes time and requires a lot of patience. It’s worth it, though.
By warming up your IP, you’ll make it onto the ‘team’ with flying colors. The IP ‘coaches’ will be impressed with your performance, and they’ll give you the place you deserve in the inbox.
This is an excellent start to your IP’s future ‘career’ in email marketing.
If you don’t warm your IP up correctly, you’ll never be able to flex your email marketing muscles and reach your full potential. Even if you can recover your sender reputation after failing to impress the IP ‘coaches’, it will take a lot of hard work.
We hope this guide will serve you well. See you on the podium!

